One of my favorite ways of taking money online is through a Gravity Form to Stripe. They're both pretty stable and I've been using that combination for about five years now.
It can be a bit of a hassle to setup initially, but once you're done, you probably won't need to touch it again. The Gravity Forms Stripe Add-On is well done and should have most of what you need.
I don't use this where a WooCommerce would be better suited. I use it more for larger contracts or recurring payments.
Jump to the section on how to give a developer access if you want to set up access for someone else to connect Gravity Forms to Stripe for you.
How to connect Gravity Forms and Stripe:
- Install and activate the Stripe Add-On
- Under Gravity Forms -> Settings go to Stripe Settings
- Click "Connect with Stripe" and follow the prompts
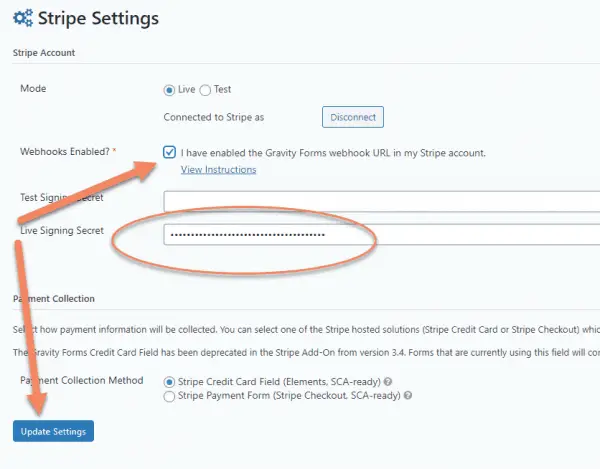
- In Stripe Settings on your website, click "View Instructions" under Webhooks Enabled and follow the instructions to setup a webhook
- Paste the Live Signing Secret into the field in your Stripe Settings, check Webhooks Enabled and Update Settings
- (optional) Add a test webhook
Let's go through those steps now.
Install and activate the Stripe Add-On
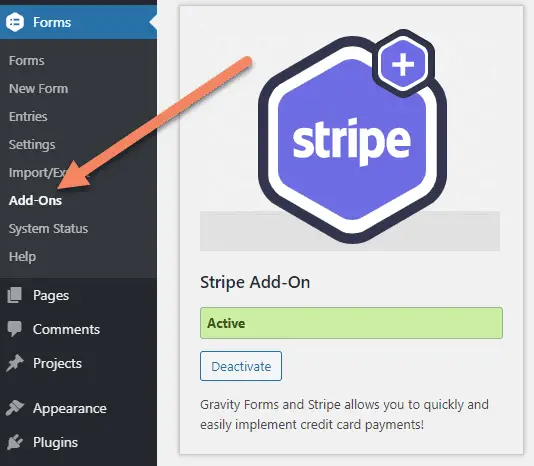
While you could add the Gravity Forms Stripe Add-On as a regular plugin, you'd have to do that through the upload feature. It's far easier to go to Gravity Forms in your WordPress admin area and click on "Add-Ons".
Scroll down to find the Stripe Add-On. Install it and activate it.
Connect Gravity Form Settings to Stripe
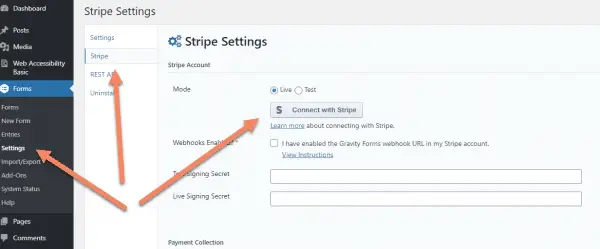
Once you have the Stripe add-on active, go to Gravity Forms -> Settings.
Go to the Stripe tab. Click "Connect with Stripe".
If you're not logged into Stripe, you'll be prompted to log in.
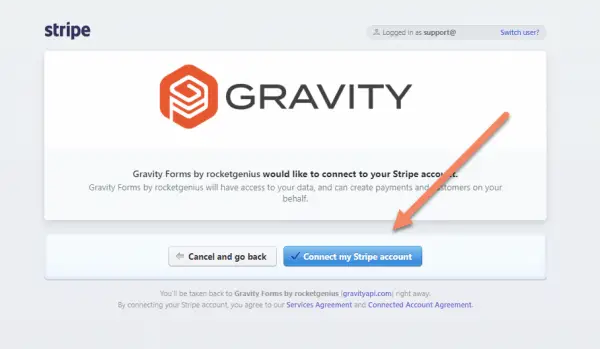
You'll see a Gravity Forms notice asking if you'd like to connect to your Stripe account.
Make sure you're logged in with the correct account (look in the top right corner).
Click "Connect my Stripe account".
Leave the Stripe tab open, because you'll be coming back to it shortly.
Setup A Webhook
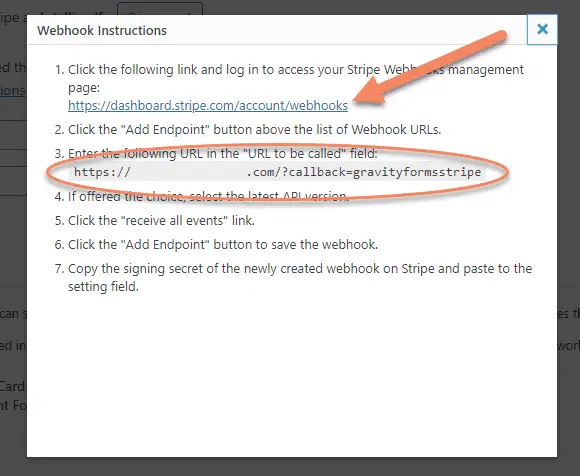
Back on your website, in the Gravity Forms -> Settings -> Stripe area, look for the Webhooks Enabled label. You should see a link to "View Instructions". Click that link.

If you see a Warning about mbstring, jump to the section below on how to deal with the mbstring warning.
You'll get a modal with the instructions to setup a webhook on Stripe and connect it with the endpoint on your website.
Copy the url from "Enter the following URL in the 'URL to be called' field".
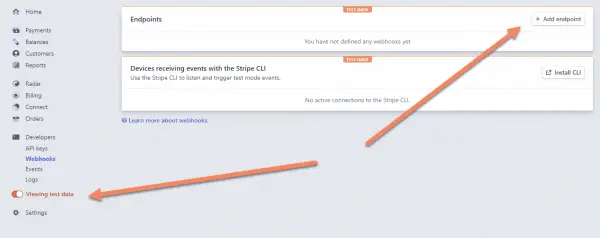
Click the link to the Stripe Webhooks management page.
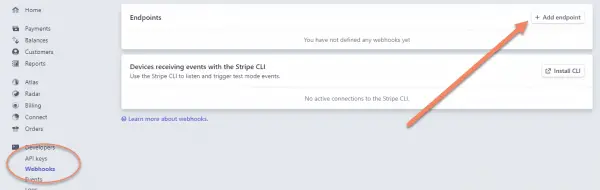
If you ever want to find the Webhooks page, it's under Developers -> Webhooks.
Under Endpoints, click "Add endpoint".
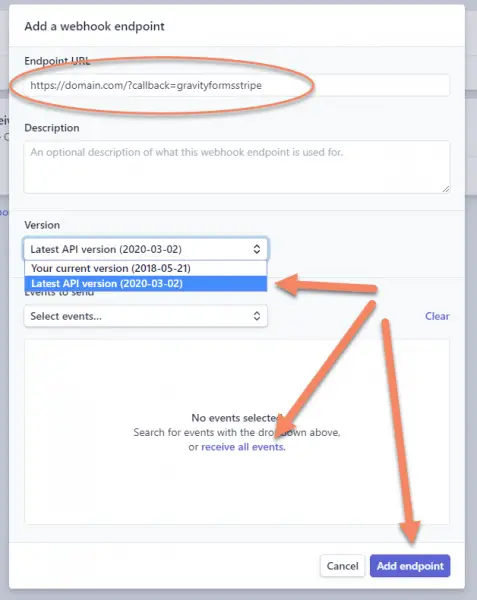
In the Endpoint URL field, paste the url from your website that you copied earlier.
You can put in a description if you like. This can be useful if you're using the Stripe account across several domains.
If you have the option to do so, always select "Latest API version" in the Version list.
Click in the box to "receive all events".
Finally, click "Add endpoint".
Finish Configuring Settings
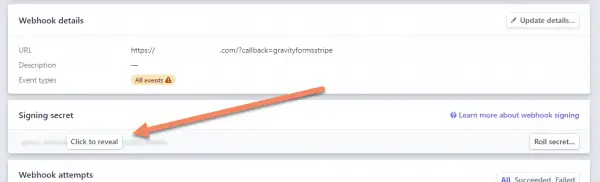
While you're still in the Webhooks area of Stripe, you need to copy the Signing secret. If you don't see it, click on the endpoint you just created.
You'll need to "Click to reveal" the signing secret.
Go back to your website in the Stripe Settings area.
Paste the signing secret into the Live Signing Secret field.
Make sure you check "I have enabled the Gravity Forms webhook URL in my Stripe account" checkbox.
Click "Update Settings".
Now Gravity Forms on your website is connected with Stripe.
To use Stripe on a Gravity Form, you'll need to add the Stripe fields and setup a Stripe feed.
Optionally add a test webhook for testing
Since you're setting everything up, it can be a good idea to also setup a Test signing webhook, in case there's a problem and you need to test what's going on with payments.
To add a test webhook, look for the "Viewing test data" toggle at the bottom left of the sidebar on Stripe. Toggling that on will put Stripe into test mode.
Follow the same steps as above for the Live endpoint. Paste the secret code into the Test Signing Secret field of the Gravity Forms -> Settings -> Stripe area.
Warning: MBString extension missing
When you connect Stripe to Gravity Forms, you might see:
"Warning: It looks like the mbstring extension is not enabled. UTF-8 strings will not properly be encoded. Ask your system administrator to enable the mbstring extension in /wp-content/plugins/gravityformsstripe/includes/stripe/stripe-php/lib/Util/Util.php on line 184".
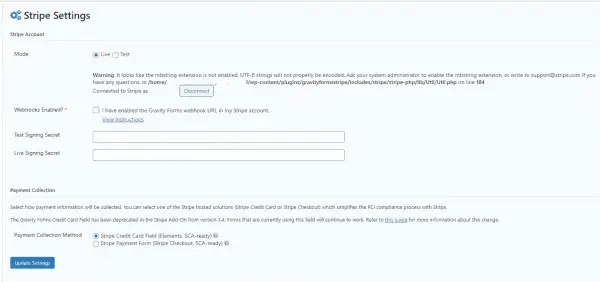
If you come across that warning and you're on shared hosting, your only option is to ask your host if they can enable mbstring for you.
If you run your own server, you can install mbstring for yourself.
How to install mbstring on WHM:
- In WHM, go to EasyApache 4
- customize the current package
- go to PHP Extensions
- search for mbstring
- toggle "install" for each of the php versions you need
- click "Review"
- provision the changes
- restart Apache
I have a full walkthrough on installing PHP extensions if you need more details on any of those steps.

How to give a developer access to Stripe
If you prefer someone else to connect Gravity Forms to Stripe, you can give access temporarily to your developer to make the changes.
How to give a developer access to Stripe:
- Log in to Stripe
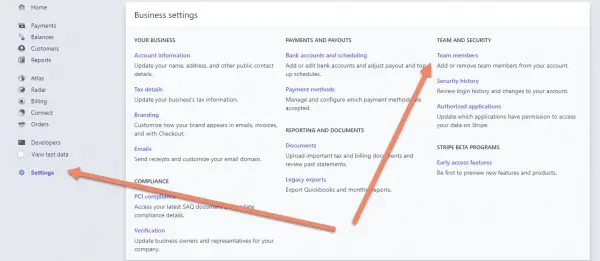
- Go to Settings (at the bottom of the sidebar)
- Under Business settings, look for "Team and Security". Click "Team".
- Enter your password if prompted
- Click "New member"
- Enter your developer's email address, set their role to "Administrator" and click "Invite"
When they've finished connecting Gravity Forms and Stripe, they won't need access to your account any more, so you can remove them as a user.
Let's go through those steps in more detail.
Once you're logged in to Stripe, go to Settings at the bottom of the sidebar.
There are a lot of settings in this area. Look for the Business settings section.
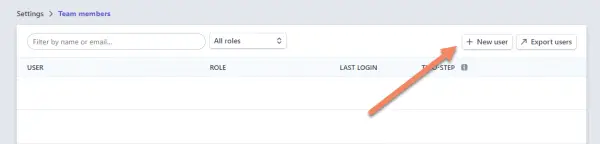
One of the headings will be "Team and Security". Under that, click "Team members" to see everyone who has access to your Stripe account.
You'll be prompted to enter your Stripe password before making any changes.

Above the list of team members, click "New user" to add a new user.
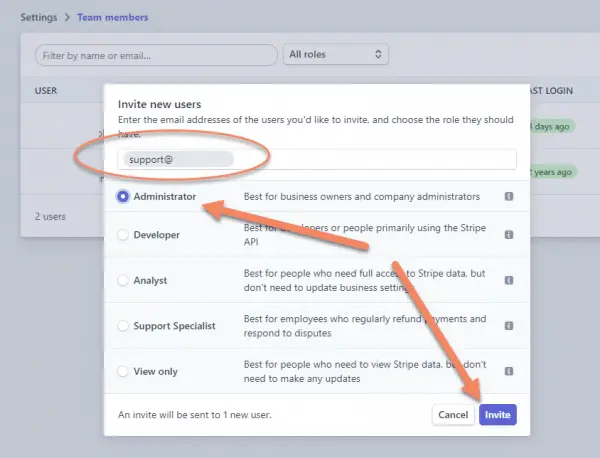
Enter your developer's email. If you need to give access to more than one person, you need to go through this process for each email address.
To connect Gravity Forms and Strips, the developer will need "Administrator" level access. I tried it with "Developer" level access and it wouldn't let me.
Click "Invite".
The developer will get an email asking if they will accept the invitation to your Stripe organisation. They need to accept the invitation to see your account in their list of accounts.
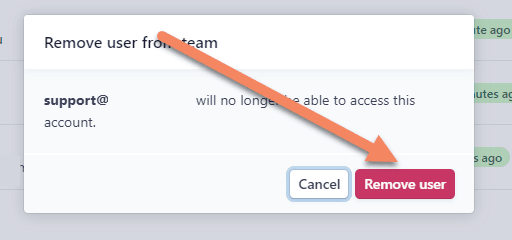
How to remove a team member from Stripe
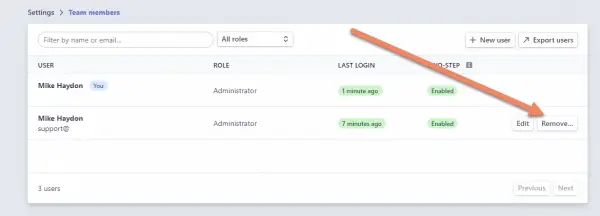
When your developer has finished doing what they need to do, you can remove them.
Go to the list of team members, find their account and click "Remove".
You'll get a confirmation popup, to stop from accidentally deleting an account. Make sure the email address is correct, then click "Remove user".