There comes a point in every business, when it's time to close down.
I closed down a business website for a client today and figured I'd walk through how I did it, for people who've not done it before.
It's not as simple as just deleting the website and walking away. You want to leave behind a notice that the site has closed down, but not have to worry about updating plugins or getting hacked.
How to close down a WordPress Website:
- Take a full backup of the website.
- Add a html notice to the home page that the site is closed.
- Change .htaccess so everything points to the home page.
- Delete the old WordPress files and database.
Let's go through those in detail.
Take a full backup of the website
Before you remove the website, make sure you take a backup of the website.
Even if you're sure you'll never want to have anything to do with it again.
Just do it. Storage space is cheap.
I've written a full tutorial on all the ways you might backup a WordPress site which you can go through if you need.
I can't tell you the number of times I've shut down a website and months later came across a similar problem that I solved on that website. It's really quick to setup the site on my local XAMPP installation and refresh my memory on what I did.
Add a html notice that the site is closed
You just want a simple notice to let people know the site has closed for good.
Create a page in the root folder (usually called "public_html") for the domain called index.html.
If you're not sure where to put the index.html file, it will be in the same folder where you have wp-config.php for the domain.
If you're not sure how to create and edit the file, see my tutorials on either editing files through FTP or editing files in cPanel. I recommend doing it through cPanel, simply because you'll need to go into cPanel to delete the files and databases later.
The code I used on today's project was:
<html>
  <head>
    <title>Jim's Widgets Has Closed</title>
    <meta name="robots" content="noindex" />
    <style>
      body {
        background-color: #1C448E;
        color: #fff;
        font-size: 20px;
      }
      .content {
        margin: 30% auto;
        max-width: 600px;
        text-align: center;
      }
      h1 {
        text-align: center;
      }
    </style>
  </head>
  <body>
    <div class="content">
    <h1>Jim's Widgets Has Closed</h1>
    <p>Unfortunately, it is time to move on from this venture.<br>Thanks to everyone for joining us in this journey.</p>
    <p>- Jim's Widgets</p>
    </div>
  </body>
</html>
That will create a splash page that looks like this:

Feel free to use that code on your site and customize it to your website.
You can just copy and paste the code into the index.html file you created earlier. Remember to save the file.
Change .htaccess so everything points to the home page
Now we want the site to redirect everyone to the home page, where the notice sits.
If you're taking down a WordPress website, you already have a .htaccess file.
If you can't see a file called .htaccess (with a dot at the start) then you might need to change a setting in your cPanel File Manager.
Open .htaccess and delete everything in there. You've taken a full backup of the site, right? If you did it manually, you included the .htaccess file too yeah?
There are many ways to do this in .htaccess, but we'll go with the simplest.
How to redirect every page to the home page in .htaccess: Set the DirectoryIndex to index.html then set the home page as the 404 ErrorDocument response.
This is the code to do that:
DirectoryIndex index.html
ErrorDocument 404 https://www.domain.com/
Just make sure to change the domain to the domain of your site.
Save the .htaccess file. Now when anyone goes to any page on the site, they'll be redirected to the home page.
The address bar will show https://www.domain.com/ rather than https://www.domain.com/index.html.
Check to make sure everything is working. Go to the homepage of the site. Try random pages that used to be on the site. Try the domain followed by random letters.
Everything should redirect to the home page where a visitor can see your notice.
Delete the old WordPress files and database
The final step is to clean up all the old files, folders and the database.
We do this so you don't leave any vulnerabilities for potential hacking.
That way you can leave the site and not have to think about it again.
On cPanel, go into File Manager.
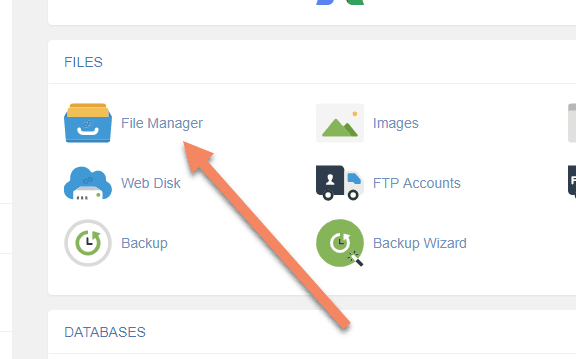
Go to the folder where you put the index.html file. It will probably be called public_html or a domain, if you used an addon domain.
Delete all the files and folders inside that folder, except for:
- .well-known/
- .htaccess
- index.html
The .well-known folder is needed for the SSL certificate. If you don't have that folder, or you don't have an SSL certificate, there's no need to create the folder.
The .htaccess and index.html files are needed to handle the redirects and the notice.
Everything else in that folder like /wp-admin/, wp-config.php and so on can go.
How to delete a WordPress database
Now we need to delete the WordPress database for the site.
In cPanel, go to MySQL Databases.
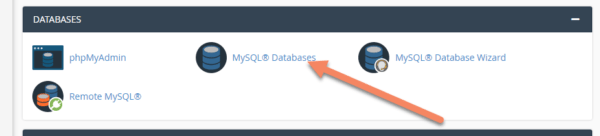
You should see the database under the title Current Databases.
If there are multiple databases in there, make sure you know which database belongs to that website.
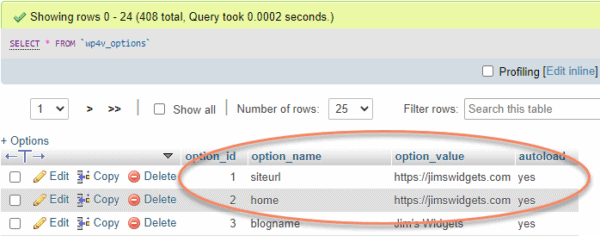
You can check by opening the site in phpMyAdmin, going to the wp_options table and looking in the home or siteurl row. It should have the URL of the site in there.
When you're satisfied that you're about to delete the correct database, click "Delete" next to the database, back on the MySQL Databases page.
Before you do so, note down the "Privileged User" next to the database. You'll need this for the next step.
If there are multiple databases, make sure that that Privileged User is not a privileged user for any of the other databases. It would be unusual if they were, because it's usually a one-to-one relationship between users and databases.

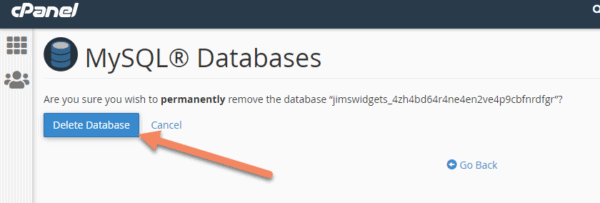
You'll be asked if you want to delete the database. Click "Delete Database".
Next we need to delete the user that attached to that database.
This is the "Privileged User" that you noted down in the previous step.
Scroll down to the Current Users heading, find the user and click "Delete".
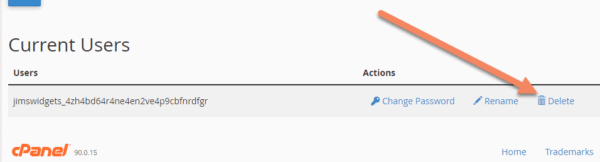
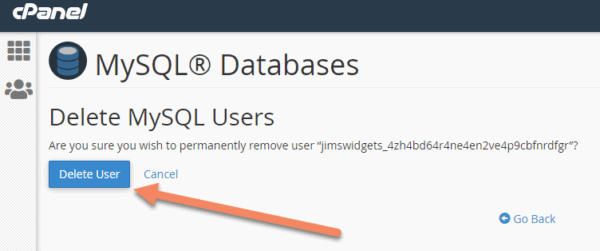
You'll be taken to a screen asking if you're sure you want to delete the user.
Click "Delete User".
Now you have successfully taken down the WordPress website and left a notice in it's place.
If you have any questions on any of these steps, please comment below.